Building SqueezeBar: How I Made a File Squisher That Lives in Your Menu Bar
Introduction
Like many developers, I found myself constantly compressing files. Need to submit a scanned document for administrative stuff? Compress it. Want to attach a demo video to a Pull Request? Compress it. File too large for an email? You guessed it, compress it.
At first, I was using those online compression websites. You know the drill: upload your file, wait for it to process, download it back, rename it, move it to the right folder… It works, but it’s slow and kind of annoying when you’re doing it multiple times a day. Plus, uploading sensitive documents to random websites always felt a bit sketchy.
So I thought, “Hey, I’m a developer. I can probably build something for this.” And that’s how SqueezeBar was born.
SqueezeBar is this little macOS app that sits in your menu bar and makes your files smaller. It’s written in Swift and SwiftUI, and honestly, I learned a lot by making a bunch of mistakes and then fixing them (classic developer move, right?).
If you’re tired of the “upload-wait-download” cycle, give it a try and let me know what you think!
App Store: SqueezeBar
This is basically me writing down everything I figured out while building it. If you’re learning macOS development or just curious about how these things work, hopefully this helps.
Here’s some files I used for testing (using different presets) and the results:
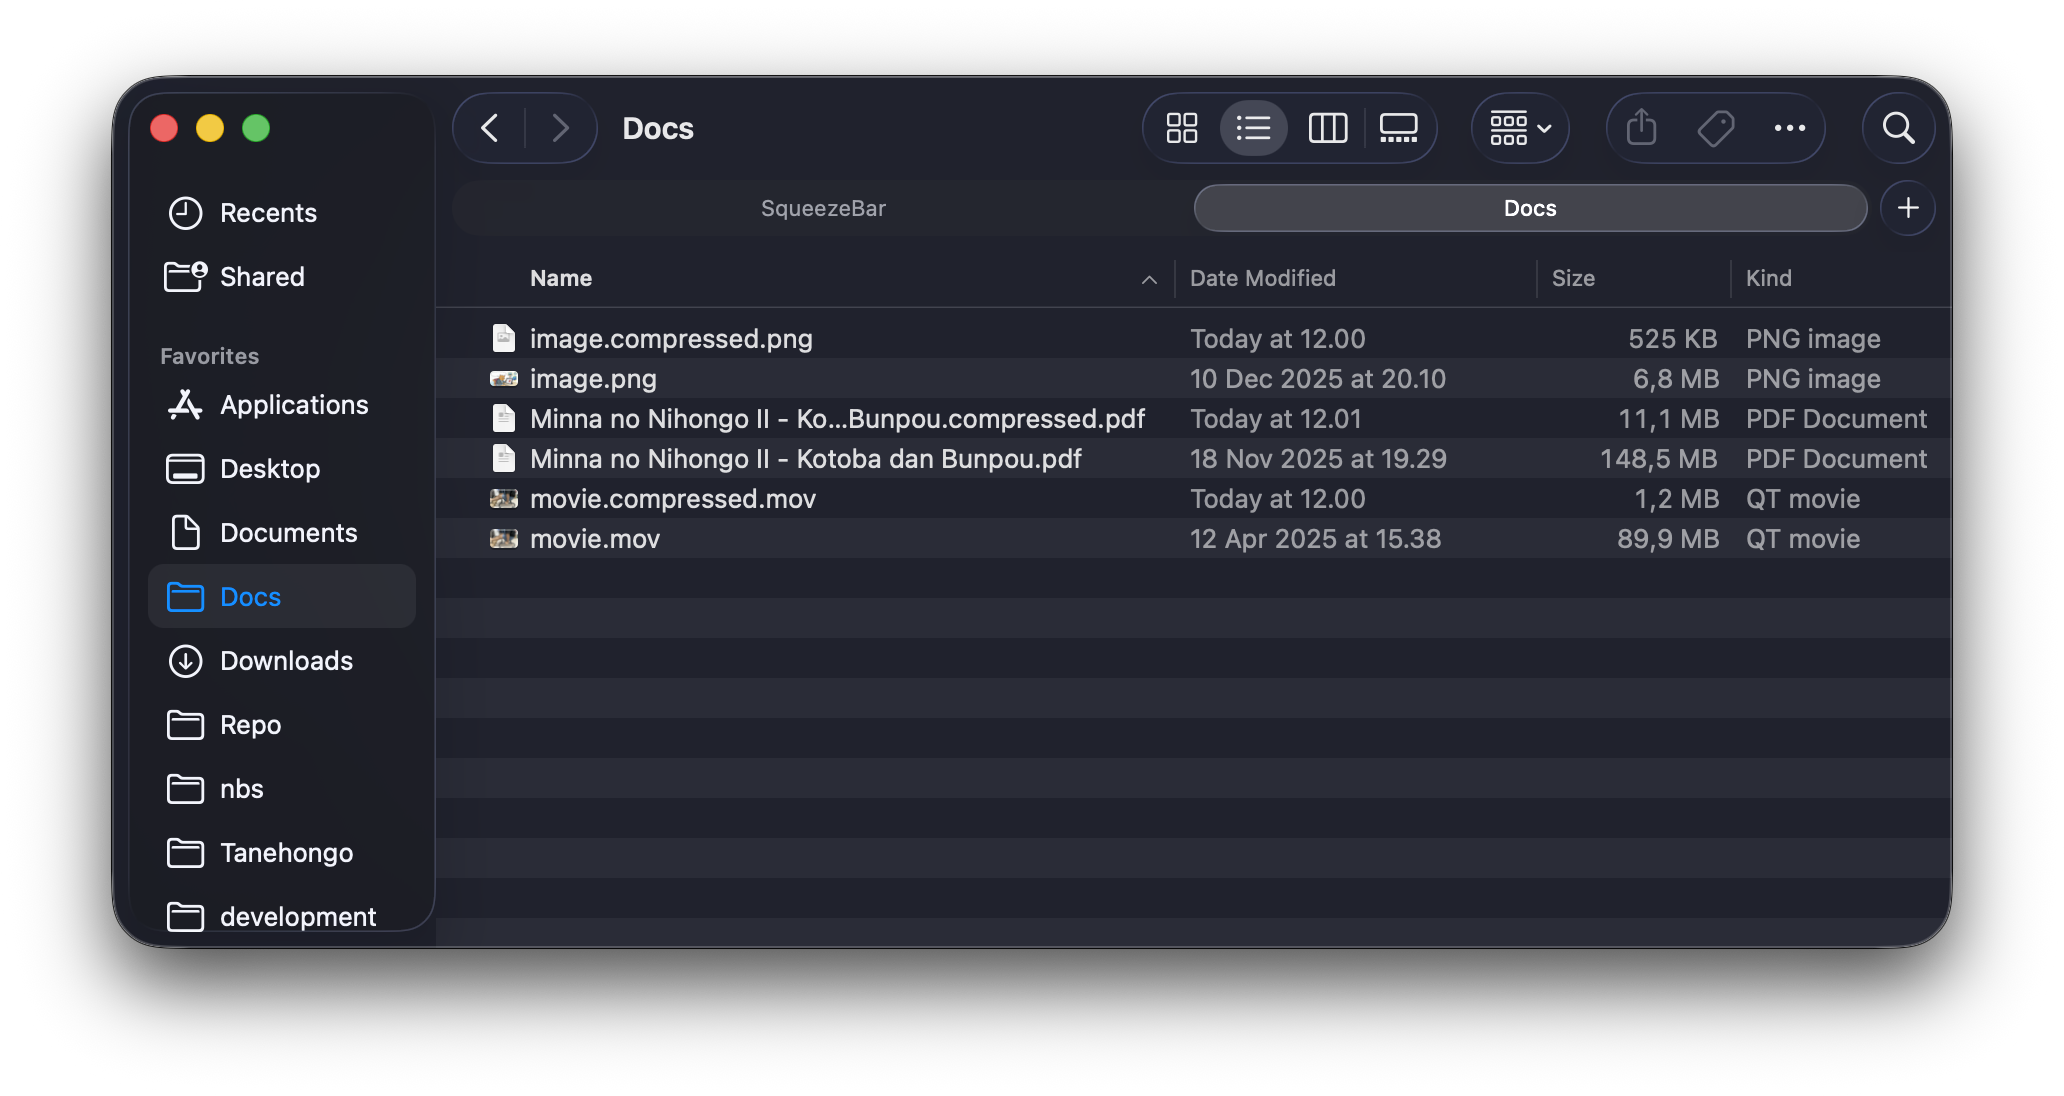
Table of Contents
- How Everything Fits Together
- Making It Live in the Menu Bar
- The “Strategy Pattern” (Fancy Name for Organized Code)
- Squishing Images
- Squishing Videos with AVFoundation
- Squishing PDFs with Ghostscript
- Apple’s Sandbox (It’s Not a Fun Sandbox)
- Async/Await (Or: How I Stopped Worrying About Callback Hell)
- The Math Behind Quality Settings
- Making Things Fast
- Things That Broke (And How I Fixed Them)
- Stuff I Learned
How Everything Fits Together
I used something called MVVM (Model-View-ViewModel). It’s a pattern that SwiftUI really likes. Basically it means keeping your UI separate from your logic, which is good because otherwise everything becomes a giant mess (trust me, I’ve been there).
The Main Ideas
1. MVVM for the UI Stuff
Views ↔ ViewModel ↔ Models
2. Strategy Pattern for Compression
CompressionManager → Strategy Protocol → Concrete Strategies
This sounds complicated but it’s actually pretty simple: each file type (images, videos, PDFs) has its own compression “strategy.” This way, if I want to add support for, say, audio files later, I don’t have to rewrite everything. I just add a new strategy. Past me was looking out for future me!
How the Folders Are Organized
SqueezeBar/
├── App/                 # App startup stuff
├── Views/               # What you see on screen
├── ViewModels/          # The brain of the operation
├── Models/              # Data structures
├── Logic/               # Where the actual work happens
│   └── Strategies/      # Different compression methods
└── Resources/           # Icons and utilities
Making It Live in the Menu Bar
Creating the Little Icon Up Top
The app uses something called NSStatusItem to put itself in your menu bar:
class AppDelegate: NSObject, NSApplicationDelegate {
    private var statusItem: NSStatusItem!
    private var popover: NSPopover!

    func applicationDidFinishLaunching(_ notification: Notification) {
        // Let it show up in both menu bar and dock
        NSApp.setActivationPolicy(.regular)

        // Create the menu bar icon
        statusItem = NSStatusBar.system.statusItem(
            withLength: NSStatusItem.variableLength
        )

        if let button = statusItem.button {
            if let image = NSImage(named: "AppIcon") {
                image.size = NSSize(width: 18, height: 18)
                button.image = image
            }
            button.action = #selector(togglePopover)
        }
    }
}
Why I Made Certain Choices (Some Better Than Others)
Why show up in BOTH menu bar AND dock?
- Turns out people (including me) keep clicking the dock icon wondering why nothing happens
- Menu bar is great for quick access
- Dock is what people expect
.regularactivation policy lets us do both, so why not?
Popover vs Regular Window?
- Popover feels more “Mac-like” (I spent way too long thinking about this)
- It automatically goes away when you click elsewhere
- Takes up less space
- Looks cleaner (in my opinion, anyway)
Fixing the Weird Grey Popover Thing
At first, my popover looked all greyish and sad, like it was tired of life. Turns out it wasn’t becoming the “key window” (which is Apple’s way of saying “the window that’s actually paying attention”). Here’s the fix:
private func showPopover() {
    guard let button = statusItem.button else { return }

    // Wake up the app
    NSApp.activate(ignoringOtherApps: true)

    // Show the popover
    popover.show(relativeTo: button.bounds, of: button, preferredEdge: .minY)

    // Make sure it's actually listening
    DispatchQueue.main.async { [weak self] in
        self?.popover.contentViewController?.view.window?.makeKey()
    }
}
The “Strategy Pattern” (Fancy Name for Organized Code)
The Strategy pattern is just a way to handle different file types without writing one giant messy function. Each file type gets its own “strategy” for compression.
The Basic Rules
protocol CompressionStrategy {
    var supportedTypes: [UTType] { get }

    func compress(
        inputURL: URL,
        outputURL: URL,
        quality: Double
    ) async throws -> CompressionResult
}
Picking the Right Strategy
The CompressionManager uses a dictionary lookup (which is super fast) to find the right compressor:
class CompressionManager {
    private let strategies: [CompressionStrategy] = [
        ImageCompressor(),
        VideoCompressor(),
        PDFCompressor()
    ]

    private lazy var strategyMap: [UTType: CompressionStrategy] = {
        var map: [UTType: CompressionStrategy] = [:]
        for strategy in strategies {
            for type in strategy.supportedTypes {
                map[type] = strategy
            }
        }
        return map
    }()
}
Why lazy initialization?
- It doesn’t build the map until you actually need it
- Then it keeps it around for next time
- Basically, being lazy is sometimes the smart choice (in programming, at least)
Figuring Out What Type of File You Have
Instead of just looking at the file extension (because people can lie about that), we ask the system:
private func getFileType(for url: URL) throws -> UTType {
    let resourceValues = try url.resourceValues(forKeys: [.contentTypeKey])
    guard let type = resourceValues.contentType else {
        throw CompressionError.unsupportedFileType
    }
    return type
}
Why not just check if it ends in “.jpg”?
- Because someone could rename “virus.exe” to “cute_cat.jpg”
- The system actually checks the file’s real type
- Much more reliable
- I learned this the hard way
Squishing Images
Image compression uses Apple’s built-in ImageIO framework, which is way better than anything I could write myself.
Two Ways to Do It
1. The Fast Way (Direct Compression)
private func compressDirectly(
    imageSource: CGImageSource,
    outputURL: URL,
    outputType: CFString,
    quality: Double
) throws {
    let imageDestination = CGImageDestinationCreateWithURL(
        outputURL as CFURL,
        outputType,
        1,
        nil
    )

    var options: [CFString: Any] = [
        kCGImageDestinationLossyCompressionQuality: quality
    ]

    // Don't accidentally rotate the image (been there, done that)
    if let properties = CGImageSourceCopyPropertiesAtIndex(imageSource, 0, nil) {
        if let orientation = properties[kCGImagePropertyOrientation] {
            options[kCGImagePropertyOrientation] = orientation
        }
    }

    CGImageDestinationAddImageFromSource(
        imageDestination,
        imageSource,
        0,
        options as CFDictionary
    )

    CGImageDestinationFinalize(imageDestination)
}
2. The Better Compression Way (Decode-Recode)
private func compressWithDecoding(
    imageSource: CGImageSource,
    outputURL: URL,
    outputType: CFString,
    quality: Double
) throws {
    guard let cgImage = CGImageSourceCreateImageAtIndex(imageSource, 0, nil) else {
        throw CompressionError.compressionFailed("Could not decode image")
    }

    // If quality is super low, make the image smaller too
    if quality < 0.4 {
        let maxDimension = 2048
        let width = cgImage.width
        let height = cgImage.height

        if width > maxDimension || height > maxDimension {
            let scale = Double(maxDimension) / Double(max(width, height))
            options[kCGImageDestinationImageMaxPixelSize] =
                Int(Double(max(width, height)) * scale)
        }
    }

    CGImageDestinationAddImage(imageDestination, cgImage, options)
}
When to Use Which One
let shouldDecodeImage = isLosslessSource || quality < 0.7

if shouldDecodeImage {
    try compressWithDecoding(...)
} else {
    try compressDirectly(...)
}
The Logic:
- If it’s a PNG or similar (lossless format), we need to convert it to JPEG
- If you want really small files (quality < 0.7), decode it first
- Otherwise, use the faster method
- This took some trial and error to figure out
Smart Format Switching
private func selectOutputType(for inputType: CFString) -> CFString {
    let typeString = inputType as String

    // PNG, BMP, TIFF → JPEG (way smaller)
    if typeString.contains("png") ||
       typeString.contains("bmp") ||
       typeString.contains("tiff") {
        return UTType.jpeg.identifier as CFString
    }

    // HEIC is already pretty good, leave it alone
    if typeString.contains("heic") || typeString.contains("heif") {
        return inputType
    }

    // When in doubt, JPEG it
    return UTType.jpeg.identifier as CFString
}
When Compression Makes Things Worse
Sometimes you can’t make a file smaller (it’s already compressed well). In that case, just use the original:
if compressedSize >= originalSize {
    try? FileManager.default.removeItem(at: outputURL)

    // Hard link is faster than copying
    // (it's like creating a shortcut that thinks it's the real file)
    do {
        try FileManager.default.linkItem(at: inputURL, to: outputURL)
    } catch {
        try? FileManager.default.copyItem(at: inputURL, to: outputURL)
    }

    return CompressionResult(
        originalSize: originalSize,
        compressedSize: originalSize
    )
}
Why “hard link” instead of copy?
- Doesn’t actually copy the data
- Almost instant
- Same file, two names pointing to it
- Falls back to copying if it doesn’t work (like if they’re on different drives)
Squishing Videos with AVFoundation
Video compression uses AVAssetExportSession, which is Apple’s fancy way of saying “we’ll use your Mac’s video chip to do this fast.”
How It Works
class VideoCompressor: CompressionStrategy {
    var supportedTypes: [UTType] {
        [.movie, .video, .mpeg4Movie, .quickTimeMovie]
    }

    func compress(
        inputURL: URL,
        outputURL: URL,
        quality: Double
    ) async throws -> CompressionResult {
        let asset = AVURLAsset(url: inputURL)

        // Pick a preset based on quality
        let preset = selectPreset(for: quality)

        guard let exportSession = AVAssetExportSession(
            asset: asset,
            presetName: preset
        ) else {
            throw CompressionError.compressionFailed("Cannot create export session")
        }

        exportSession.outputURL = outputURL
        exportSession.outputFileType = .mp4

        await exportSession.export()

        // Did it work?
        guard exportSession.status == .completed else {
            throw CompressionError.compressionFailed("Export failed")
        }
    }
}
Choosing Quality Presets
AVFoundation doesn’t let you pick exact quality numbers, so you pick from presets:
private func selectPreset(for quality: Double) -> String {
    switch quality {
    case 0.8...1.0:
        return AVAssetExportPresetHighestQuality
    case 0.5..<0.8:
        return AVAssetExportPresetMediumQuality
    default:
        return AVAssetExportPresetLowQuality
    }
}
Why only three options?
- Apple decided these are the ones you get
- Hardware encoders work best with specific settings
- At least they’re consistent
- I’m not bitter about the lack of control (okay, maybe a little)
Squishing PDFs with Ghostscript
PDF compression uses Ghostscript, which is this really powerful (and slightly intimidating) tool that’s been around forever.
Why Ghostscript?
- It’s the industry standard for PDF stuff
- Really good at making PDFs smaller
- Doesn’t mess up the PDF structure
- Free to use
- I just bundle it with the app so you don’t need to install anything
Using Ghostscript
class PDFCompressor: CompressionStrategy {
    func compress(
        inputURL: URL,
        outputURL: URL,
        quality: Double
    ) async throws -> CompressionResult {
        let gsPath = try getGhostscriptPath()
        let pdfSettings = selectPDFSettings(for: quality)

        let process = Process()
        process.executableURL = URL(fileURLWithPath: gsPath)
        process.arguments = [
            "-sDEVICE=pdfwrite",
            "-dCompatibilityLevel=1.4",
            "-dPDFSETTINGS=/\(pdfSettings)",
            "-dNOPAUSE",
            "-dQUIET",
            "-dBATCH",
            "-sOutputFile=\(outputURL.path)",
            inputURL.path
        ]

        try process.run()
        process.waitUntilExit()
    }
}
Quality Levels
Ghostscript has pre-defined settings with weird names:
private func selectPDFSettings(for quality: Double) -> String {
    switch quality {
    case 0.8...1.0:
        return "prepress"  // For professional printing
    case 0.5..<0.8:
        return "ebook"     // Good balance
    default:
        return "screen"    // Tiny files, screen-only quality
    }
}
Finding Ghostscript in the App Bundle
private func getGhostscriptPath() throws -> String {
    guard let gsPath = Bundle.main.path(
        forResource: "gs",
        ofType: nil,
        inDirectory: "Resources/Binaries"
    ) else {
        throw CompressionError.missingDependency("Ghostscript not found")
    }
    return gsPath
}
Apple’s Sandbox (It’s Not a Fun Sandbox)
macOS has this security feature called “sandboxing” which is great for users but kind of annoying for developers. Basically, your app can’t just access files willy-nilly.
Security-Scoped Bookmarks (Sounds Scarier Than It Is)
To remember which folder you’re allowed to save to, you need to create “bookmarks”:
class AppSettings: ObservableObject {
    @Published var outputFolderURL: URL? {
        didSet {
            saveOutputFolder()

            if let newURL = outputFolderURL {
                isAccessingSecurityScope =
                    newURL.startAccessingSecurityScopedResource()
            }
        }
    }

    private func saveOutputFolder() {
        guard let url = outputFolderURL else { return }

        do {
            let bookmark = try url.bookmarkData(
                options: .withSecurityScope,
                includingResourceValuesForKeys: nil,
                relativeTo: nil
            )
            UserDefaults.standard.set(bookmark, forKey: "outputFolderBookmark")
        } catch {
            print("Failed to save bookmark: \(error)")
        }
    }

    private func loadOutputFolder() {
        guard let bookmark = UserDefaults.standard.data(
            forKey: "outputFolderBookmark"
        ) else { return }

        do {
            var isStale = false
            let url = try URL(
                resolvingBookmarkData: bookmark,
                options: .withSecurityScope,
                relativeTo: nil,
                bookmarkDataIsStale: &isStale
            )

            if !isStale {
                outputFolderURL = url
            }
        } catch {
            print("Failed to resolve bookmark: \(error)")
        }
    }
}
Making Sure You Have Access
Before compressing, check if you’re still allowed to use that folder:
func ensureAccess() -> Bool {
    guard let url = outputFolderURL else { return false }

    if isAccessingSecurityScope {
        return true
    }

    if url.startAccessingSecurityScopedResource() {
        isAccessingSecurityScope = true
        return true
    }

    return false
}
Cleanup (Important!)
If you don’t stop accessing the resource, bad things happen (memory leaks, angry system):
deinit {
    if let url = outputFolderURL, isAccessingSecurityScope {
        url.stopAccessingSecurityScopedResource()
        isAccessingSecurityScope = false
    }
}
Async/Await (Or: How I Stopped Worrying About Callback Hell)
Swift’s modern concurrency features make things so much easier than the old callback style. Instead of callback pyramids, you get nice linear code.
How Compression Works Asynchronously
func compressFile(settings: AppSettings) async {
    guard let inputURL = droppedFileURL else { return }

    await MainActor.run {
        isCompressing = true
        errorMessage = nil
    }

    let inputAccessing = inputURL.startAccessingSecurityScopedResource()

    do {
        let quality = try calculateQuality(settings: settings, inputURL: inputURL)

        let result = try await compressionManager.compress(
            inputURL: inputURL,
            outputFolder: outputFolder,
            quality: quality
        )

        await MainActor.run {
            lastResult = result
            statusMessage = formatSuccessMessage(result: result)
        }

        // Clean up after 3 seconds (feels natural)
        try? await Task.sleep(for: .seconds(3))

        await MainActor.run {
            self.droppedFileURL = nil
            self.statusMessage = ""
        }
    } catch {
        await MainActor.run {
            errorMessage = formatErrorMessage(error)
        }
    }

    if inputAccessing {
        inputURL.stopAccessingSecurityScopedResource()
    }

    await MainActor.run {
        isCompressing = false
    }
}
Important Patterns
1. MainActor for UI Updates
await MainActor.run {
    self.isCompressing = false
}
UI stuff MUST happen on the main thread. This makes sure it does.
2. Cleanup with Defer
defer {
    if inputAccessing {
        inputURL.stopAccessingSecurityScopedResource()
    }
}
This runs no matter what, even if there’s an error.
3. Sleeping
try? await Task.sleep(for: .seconds(3))
Wait without freezing the UI. Magic!
The Math Behind Quality Settings
This was probably the hardest part to figure out. Users can say “I want this 10MB file to be 5MB” but how do you know what quality setting will get you there?
The Problem
Users might want:
- Direct Quality: “Use 70% quality”
- Target Size: “Make it 5 MB”
- Percentage: “Make it half the size”
For options 2 and 3, I need to guess what quality setting will work.
Image Quality Formula
After a lot of testing (and some files coming out the wrong size), I found this formula works pretty well:
finalSize ≈ baselineSize + compressionFactor × quality^exponent
More specifically:
size = 0.15 + 0.85 × quality^1.8
To solve for quality:
let adjustedRatio = max(0.15, targetRatio)
let normalizedRatio = (adjustedRatio - 0.15) / 0.85
let quality = pow(normalizedRatio, 1.0 / 1.8)
What do these magic numbers mean?
- 0.15: Even at minimum quality, files have some overhead (headers, metadata, etc.)
- 0.85: The part that’s actually compressible
- 1.8: This I found through trial and error (it’s different for each format)
- I’m not a mathematician, I just pressed buttons until it worked
Video Quality Mapping
Videos are simpler because you only have three presets:
if targetRatio > 0.75 {
    quality = 0.85  // High quality
} else if targetRatio > 0.5 {
    quality = 0.55  // Medium quality
} else {
    quality = 0.25  // Low quality
}
PDF Quality Mapping
Similar story for PDFs:
if targetRatio > 0.7 {
    quality = 0.85  // prepress
} else if targetRatio > 0.4 {
    quality = 0.65  // ebook
} else {
    quality = max(0.1, 0.4 + (targetRatio - 0.1) * 0.3)  // screen
}
Calculating Target Size
private func calculateQuality(
    settings: AppSettings,
    inputURL: URL
) throws -> Double {
    switch settings.compressionMode {
    case .targetSize:
        guard let resourceValues = try? inputURL.resourceValues(
            forKeys: [.fileSizeKey, .contentTypeKey]
        ),
        let fileSize = resourceValues.fileSize,
        let contentType = resourceValues.contentType else {
            return 0.5
        }

        let targetBytes = Double(settings.targetSizeMB * 1024 * 1024)
        let originalBytes = Double(fileSize)

        // If target is bigger than original, just use high quality
        if targetBytes >= originalBytes * 0.95 {
            return 0.95
        }

        let targetRatio = targetBytes / originalBytes

        // Use the right formula for this file type
        return calculateQualityForRatio(targetRatio, type: contentType)
    }
}
Making Things Fast
Small optimizations add up, especially when you’re processing large files.
1. Better File Size Reading
Before (slow):
let attributes = try FileManager.default.attributesOfItem(atPath: url.path)
let size = attributes[.size] as? Int64
After (fast):
let resourceValues = try url.resourceValues(forKeys: [.fileSizeKey])
let size = Int64(resourceValues.fileSize ?? 0)
Why it’s better:
- Goes straight to the system
- No dictionary overhead
- Type-safe
- Faster when you only need one thing
2. Cached Strategy Map
Before (had to search every time):
for strategy in strategies {
    if strategy.supportedTypes.contains(where: { fileType.conforms(to: $0) }) {
        return strategy
    }
}
After (instant lookup):
private lazy var strategyMap: [UTType: CompressionStrategy] = {
    // Build once
}()

// O(1) lookup
if let strategy = strategyMap[fileType] {
    return strategy
}
3. Timestamp-Based File Names
Before (slow when many files):
var counter = 1
while FileManager.default.fileExists(atPath: path) {
    path = "\(basename).\(counter).\(ext)"
    counter += 1
}
After (instant):
let timestamp = Int(Date().timeIntervalSince1970)
let path = "\(basename).compressed.\(timestamp).\(ext)"
Why it’s better:
- No checking if file exists
- Almost instant
- Collisions are super rare
- Works great even with lots of files
4. Hard Links Instead of Copies
// Try hard link first (basically free)
do {
    try FileManager.default.linkItem(at: inputURL, to: outputURL)
} catch {
    // If that doesn't work, copy it
    try? FileManager.default.copyItem(at: inputURL, to: outputURL)
}
5. Background Queue for System Stuff
func openResultFolder() {
    guard let result = lastResult else { return }

    DispatchQueue.global(qos: .userInitiated).async {
        let folderURL = result.compressedURL.deletingLastPathComponent()
        NSWorkspace.shared.open(folderURL)
    }
}
Don’t block the UI for file operations!
Things That Broke (And How I Fixed Them)
Problem 1: The Grey, Sad-Looking Popover
What happened: The popover looked all washed out and didn’t respond to clicks.
Why: It wasn’t becoming the “key window” (Apple’s term for “the window that’s actually active”).
Fix:
DispatchQueue.main.async { [weak self] in
    self?.popover.contentViewController?.view.window?.makeKey()
}
Problem 2: The “Publishing During View Updates” Warning
What happened: Scary warning messages in the console.
Why: I was updating @Published properties during the drop event, which SwiftUI doesn’t like.
Fix:
DispatchQueue.main.async {
    // All @Published updates go here
}
Problem 3: Files Disappeared After Restarting
What happened: After restarting the app, it couldn’t save files anymore.
Why: Lost permission to access the folder.
Fix: Security-scoped bookmarks (see the sandbox section).
Problem 4: PDF Quality Was All Over the Place
What happened: Sometimes PDFs would be huge, sometimes tiny, same settings.
Why: Ghostscript only has three settings, not fine-grained control.
Fix: Map quality ranges to the right preset, with some interpolation for the “screen” mode.
Problem 5: “Compressed” Files Getting Bigger
What happened: Already-compressed files got bigger after “compression.”
Why: Re-encoding overhead was more than any compression gain.
Fix: Compare sizes and just use the original if compression makes it worse.
Problem 6: App Store Rejected My Archive Because of Ghostscript
What happened: When I tried to upload to the App Store, validation failed with:
gs does not have sandbox entitlements enabled
Why: So here’s the thing - when you bundle executable binaries (like Ghostscript) inside a sandboxed macOS app, Apple requires EVERY executable to be properly signed with sandbox entitlements. I was signing the gs binary with the hardened runtime flag, but I completely forgot to give it entitlements. Apple was like “nope, not gonna let you through.”
Even worse, Xcode’s automatic file synchronization was creating TWO copies of the Ghostscript binary in different folders, and both needed to be signed. Fun times!
Fix: I had to create a separate entitlements file just for the Ghostscript binary:
<?xml version="1.0" encoding="UTF-8"?>
<!DOCTYPE plist PUBLIC "-//Apple//DTD PLIST 1.0//EN" "http://www.apple.com/DTDs/PropertyList-1.0.dtd">
<plist version="1.0">
<dict>
    <key>com.apple.security.app-sandbox</key>
    <true/>
    <key>com.apple.security.inherit</key>
    <true/>
    <key>com.apple.security.cs.allow-unsigned-executable-memory</key>
    <true/>
    <key>com.apple.security.cs.disable-library-validation</key>
    <true/>
</dict>
</plist>
The key part is com.apple.security.inherit - this tells macOS that the binary should inherit all the file access permissions from the parent app. So I don’t need to duplicate all the file access entitlements; the gs binary just gets whatever SqueezeBar can access.
Then I updated my build script to sign the binary WITH these entitlements:
codesign --force \
         --sign "${EXPANDED_CODE_SIGN_IDENTITY}" \
         --timestamp \
         --options runtime \
         --entitlements "$GS_ENTITLEMENTS" \
         "$DEST_GS"
The --entitlements flag was the missing piece. After that, validation passed and I could finally submit to the App Store.
Lesson learned: If you’re bundling ANY executable in a sandboxed app (helper tools, scripts, binaries), they ALL need to be signed with proper entitlements. Don’t make the same mistake I did!
Stuff I Learned
1. SwiftUI + AppKit: Best Friends Forever (Kind Of)
SwiftUI is great, but macOS menu bar stuff still needs AppKit. Luckily, bridging them is pretty easy:
popover.contentViewController = NSHostingController(rootView: MainPopoverView())
2. Security-Scoped Resources Are a Must
For sandboxed apps, you MUST handle bookmarks properly:
- Create them with
.withSecurityScope - Start accessing before use
- Stop accessing when done
- Handle it when they go stale
This took me way too long to get right.
3. Strategy Pattern Is Pretty Great
Adding new file types is super easy:
- Make a new strategy class
- Implement the protocol
- Add it to the array
No need to touch any existing code!
4. Async/Await Makes My Brain Happy
Compared to the old callback style:
- Code reads top to bottom (like normal)
- Errors automatically propagate up
- Way easier to understand
- My code reviews got shorter
5. Apple’s Built-In Stuff Is Really Good
ImageIO, AVFoundation, PDFKit give you:
- Hardware acceleration (fast!)
- Support for tons of formats
- Metadata preservation
- Great performance
Most of the time, you don’t need third-party libraries.
6. Estimating Compression Is Hard
Compression isn’t linear. It varies by format. The only way to get good formulas is to test with real files.
I still don’t have perfect formulas (turns out I’m not a wizard).
7. Small Optimizations Add Up
Using resourceValues instead of attributes, hard links instead of copies, cached maps… all these little things make the UI feel snappier.
Users notice when things feel slow, even if it’s just a few milliseconds.
8. Make It Feel Nice to Use
Things like auto-cleanup after 3 seconds, showing instant feedback, and having smart defaults make the app feel more polished.
Also, never underestimate the power of good defaults. Most people will just use what you give them.
Wrapping Up
Building SqueezeBar was a fun journey into macOS development. SwiftUI makes UI easy, Swift’s async/await makes concurrency less scary, and Apple’s frameworks are really powerful.
The Strategy pattern kept my code clean and easy to extend. Security-scoped bookmarks were annoying but necessary. And async/await saved me from callback hell.
Most importantly, I learned that sweating the small stuff (fast file operations, instant feedback, automatic cleanup) makes the difference between “yeah it works” and “this feels nice to use.”
What’s Next
Some ideas for future versions (if I get around to it):
- Process multiple files at once
- Support for audio and archive files
- Save common settings as presets
- Show before/after preview
- Better progress bar (the current one is kind of basic)
The code is organized well enough that adding these should be pretty straightforward. Famous last words, right?
Repository: github.com/dimaswisodewo/SqueezeBar
Author: Meynabel Dimas Wisodewo
Built with: Swift 5, SwiftUI, Xcode 26.1.1
Platform: macOS 12.0+
This is a real project I built. All the code examples are from the actual SqueezeBar app. I hope this helps someone out there who’s trying to build something similar. Or at least makes you chuckle at my mistakes.