How iOS Handles Events When You Touch the Screen: ⛓️ Responder Chain
Introduction
Think about every time you touch your phone screen. You tap a button and the app works right away. But how does your phone know exactly which spot you touched? How does it find one small button among all the different parts of an app? It is like a quick game of hide and seek that happens in a split second. Let’s go behind the screen and follow a tap from your finger all the way to the code.
⛓️ Responder Chain
Think of the Responder Chain as a corporate hierarchy of responsibility. If a junior employee (a specific View) receives a request (an Event) they aren’t authorized to handle, they pass it to their manager (Superview). If the manager is stumped, they pass it to the department head (ViewController), and so on, until it reaches the CEO (UIApplication).
Understanding this flow is the difference between fighting with UIKit and working with it. Let’s dive into the foundation, the phases, and the practical applications of this system.
1. The Foundation: UIResponder
The entire system relies on a single abstract base class: UIResponder. Almost every object that populates your screen inherits from this class.
Because they are “Responders”, these objects share two critical capabilities:
-
Handle Events: They can react to touches, presses, and motion via methods like
touchesBegan,pressesBegan, andmotionEnded. -
Forward Events: They possess a
nextproperty, allowing them to pass an event to a “next” responder if they choose not to handle it.
The usual suspects inheriting from UIResponder:
-
UIView(including all subclasses likeUIButton,UILabel, etc.) -
UIViewController -
UIWindow -
UIApplication -
AppDelegate
2. The Two Phases of Event Handling
A common mistake is thinking the Responder Chain “finds” the touch. In reality, iOS event handling is a two-act play with two opposite flows:
Phase A: Hit-Testing (Finding the Target)
Before the Responder Chain can act, iOS must determine who the First Responder is. This is a top-down search (from Parent to Child).
-
The system starts at the
UIWindow. -
It calls
hitTest(_:with:)recursively down the view hierarchy. -
It asks each view: “Did this touch happen inside your bounds?” (
point(inside:with:)). -
It finds the deepest, visually front-most subview that contains the touch point.
Result: That specific view is crowned the First Responder 👑.
Phase B: The Responder Chain (Handling the Event)
Now that the First Responder is identified, the event handling begins. This is a bottom-up flow (from Child to Parent). The event travels up the chain until someone handles it or it “falls off the edge” of the app and is discarded.
3. Performance & “Branch Pruning”
A deep view hierarchy might seem slow to traverse, but iOS is highly optimized using Branch Pruning. The system doesn’t check every single view, it ignores entire branches of the view tree if the parent fails the initial check.
Here is the logic represented in code:
func hitTest(_ point: CGPoint, with event: UIEvent?) -> UIView? {
    // 1. THE GATEKEEPERS
    // If hidden, interaction disabled, or transparent -> Ignore this view AND all children.
    guard isUserInteractionEnabled, !isHidden, alpha > 0.01 else { return nil }

    // 2. THE BOUNDS CHECK
    // If the touch is NOT inside this view -> Stop here. Do not check children.
    guard self.point(inside: point, with: event) else { return nil }

    // 3. THE REVERSE LOOP (Visual Priority)
    // Check subviews in reverse order (top-most/last-added views first).
    for subview in subviews.reversed() {
        let convertedPoint = subview.convert(point, from: self)
        if let hitView = subview.hitTest(convertedPoint, with: event) {
            return hitView
        }
    }

    // If no children claimed it, this view is the hit-test winner.
    return self
}
Insight: If you touch the screen and the parent view returns
nilforpoint(inside:with:), the system instantly skips its 1,000 subviews. This makes hit-testing incredibly efficient regardless of UI complexity.
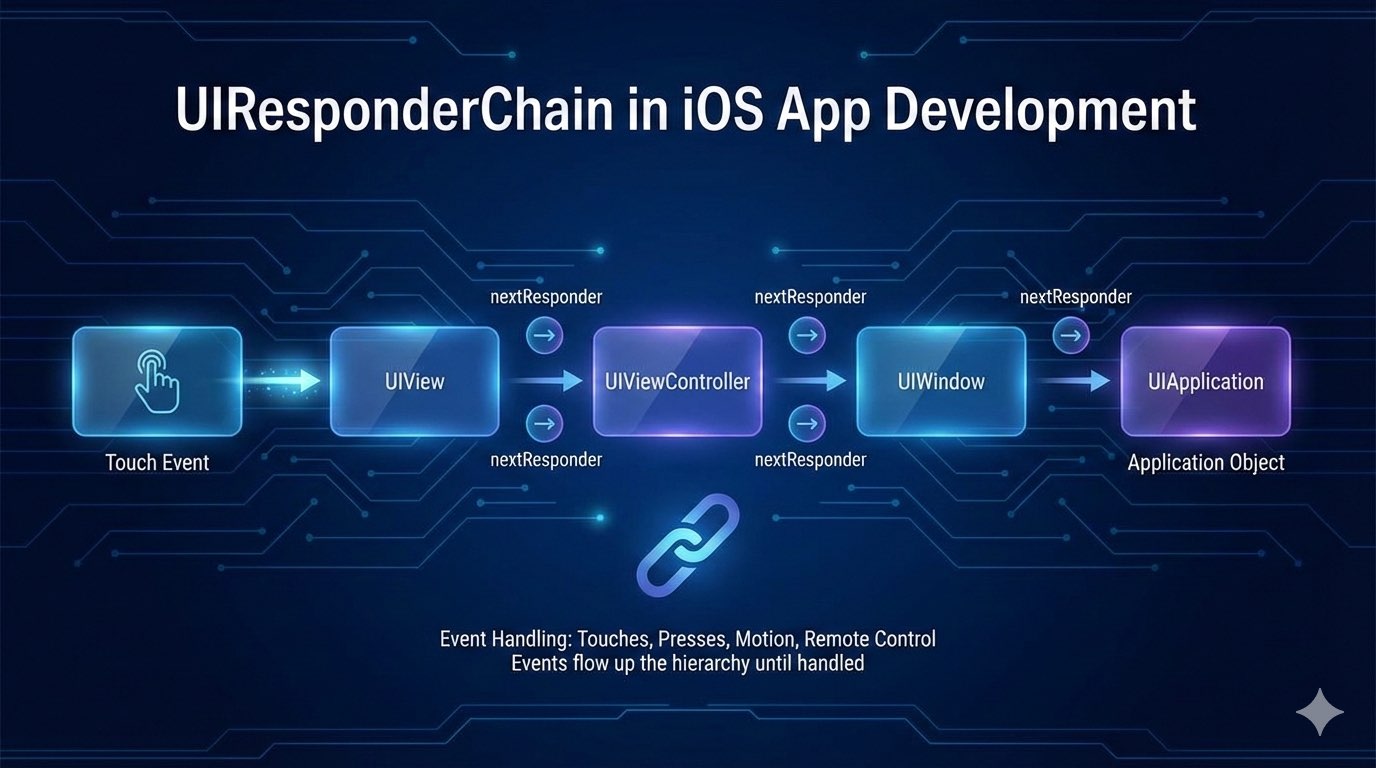
4. The Path of the Chain: Who is next?
Once a view is identified as the First Responder, it uses the next property to find its successor. Here is the standard logic for the chain:
Responder
The next Responder
UIView
Its superview. (If it’s a VC’s root view, then the UIViewController).
UIViewController
The presentingViewController or the UIWindow.
UIWindow
The UIApplication object.
UIApplication
The AppDelegate (if the delegate is a UIResponder).
The Chain Visualization:
Button → Container View → Root View → ViewController → Window → Application → AppDelegate → nil (discarded).
5. How Events “Moving Up” ⬆️
When an event occurs, the First Responder is the first one to see the message. Now, it has three choices:
- Consume: Override
touchesBegan, perform an action, and do not callsuper.touchesBegan. The chain stops. - Ignore: Do nothing. The default implementation of
UIResponderautomatically forwards the call tonext?.touchesBegan. - Observe & Pass: Perform a side effect (like an animation or log) and then call
super.touchesBeganto let the rest of the chain see the event.
6. Advanced Feature: Target-Action with nil Target
This is a powerful, underutilized feature of the Responder Chain. Usually, you link a button to a specific target:
button.addTarget(self, action: #selector(doSomething), for: .touchUpInside)
However, if you set the target to nil:
button.addTarget(nil, action: #selector(performCustomAction), for: .touchUpInside)
iOS will dynamically search the Responder Chain at runtime to find an object that implements performCustomAction 🤯.
Why use this? Imagine a “Delete” button inside a deeply nested UITableViewCell. The cell shouldn’t handle data logic, and the table view is just a container. By setting the target to nil, the button press automatically travels up until it hits the ViewController, which contains the actual business logic to delete the item. This decouples the UI from the logic.
7. UIResponder vs. UIGestureRecognizer
Where do Gesture Recognizers fit? They aren’t strictly part of the Responder Chain, but they act as interceptors.
- Hit-Testing finds the view.
- The view’s attached Gesture Recognizers get the touch first.
- If a Gesture (like a Swipe) is recognized, it “swallows” the touch. The view receives
touchesCancelled, and the Responder Chain is halted. - If the Gesture fails, the touches travel through the Responder Chain as normal.
Summary
The Responder Chain is the nervous system of your iOS app.
- Hit-Testing goes down to find the target.
- Responder Chain goes up to find a handler.
- Nil Targets allow for elegant, decoupled communication.
The next time a button isn’t responding, don’t just check isUserInteractionEnabled. Think about the chain: is there a transparent view on top? Is a gesture recognizer intercepting the touch? Understanding the flow makes debugging these issues a breeze.